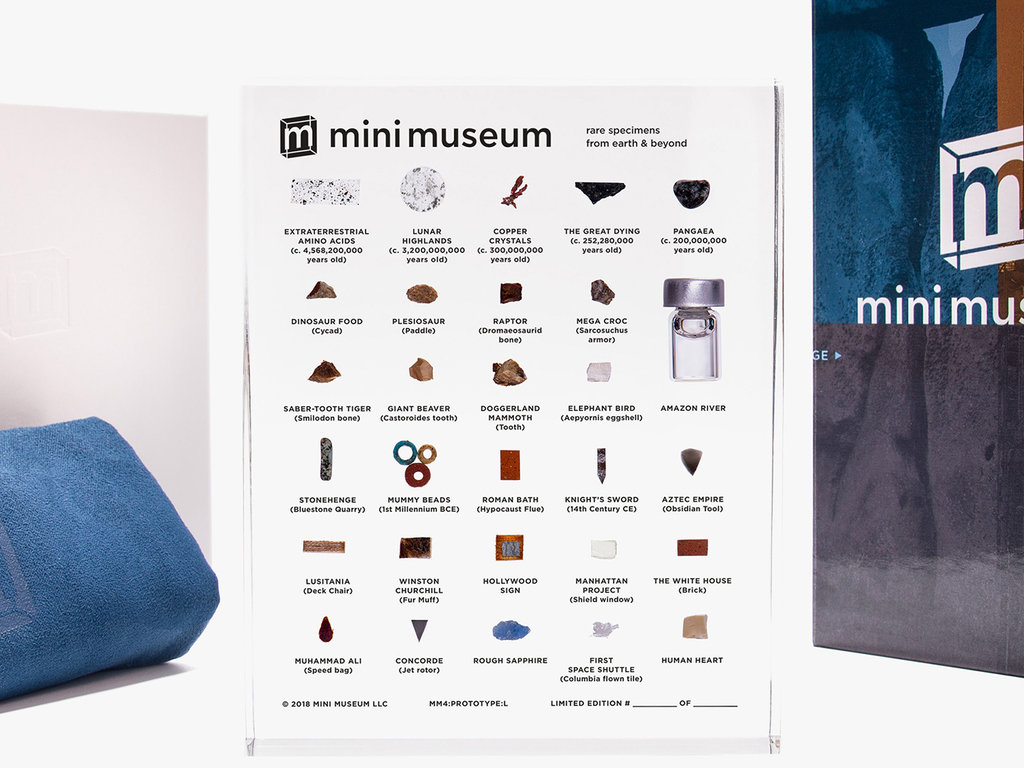
Beginning with amino acids captured during the birth of the solar system, the Fourth Edition takes you on a new journey spanning billions of years of science and history.
You'll visit the bright highlands of the Moon, witness devastating and cataclysmic events here on Earth, and examine hundreds of millions of years of evolution. You'll turn your attention to the march of human civilization. The collection ends by turning back toward the promise of space and marveling at the wonder of life.
And it's all right here in the palm of your hand...
Latest Updates from Our Project:
Production Update! Shipping Should Begin Next Week, Short Delay on Stands and Smalls, On Long Running Projects, A Look at NASA's Dawn
over 5 years ago
– Sat, Oct 27, 2018 at 05:52:27 PM
Hello, everyone!
I am happy to announce that the Companion Guides and the first shipment of Large Mini Museums arrived in the warehouse yesterday. Jamie will be at the warehouse when it opens on Monday morning to inspect these items, after which we'll be ready to begin queuing up shipments for Batch 01 and the Shuttle Edition Tiers!
While the arrival of these items is great news for many backers, we are still waiting on the Illuminated LED Stand production sample and the first batch of Small Mini Museums. I don't have a firm delivery date yet, but I suspect we're looking at two weeks. I know this is disappointing and I am very sorry. Looking back, we should have padded our schedule a bit more on these two and set better expectations.
At this time, the delay impacts those of you in Batch 01 and the Shuttle Edition Tier who also added the Stand or the Small Mini Museum. I want to assure those of you who are impacted that your place in the Large Mini Museum queue will not change. We'll hang on to your Mini Museum and add-ons, and once all the items are available, we will prioritize your shipments so they move out quickly.
The good news is that we're very close on both items. The Small Mini Museums are in assembly while the Stand is undergoing another (and hopefully final) tuning of the fit and adjustments to formulation of the ABS plastic and coatings to dampen the light bleed you can see in the 3D printed prototypes (see below):
Prototype Illuminated LED Stand Close-Up
There will still be a little light bleed as the production LEDs are powerful, but it doesn't need to be that strong. We expect the next round to clear that up and we can green light the run.
For those of you in the remaining batches, I'm happy to report that Large Mini Museum production is still on schedule. Batch 02 is scheduled to arrive in the warehouse the week of November 5th and Batch 03 should begin arriving a week later. Batch 04 and Batch 05 are entering polishing and QA on plan.
T-Shirts are in production and should arrive within the next week. We're not sure they'll arrive in time for the earliest shipments but we won't let that hold anything back. Rather, we'll deviate from our original plan to send them along separately once they arrive.
The first batch of Touch Mini Museums are also complete and will be delivered to the warehouse on Monday. We'll start shipments on those right away after the inspection of the Companion Guides.
I will have more details to share on this next week along with a status report on the warehouse inspection and the first wave of shipping! Thank you for your patience!
On Long Running Projects, A Look at NASA's Dawn
A week ago, NASA shared a tribute video for the Dawn Mission.
This research spacecraft is the first to orbit a body in the asteroid belt. Dawn visited Vesta. The data and imagery it returned was invaluable to science and also played a big role in our own exploration of the asteroid belt during the Second Edition of the Mini Museum.
Geological Map of Asteroid Vesta (Image Credit: NASA / JPL-Caltech / ASU)
Dawn went on to visit the dwarf planet Ceres, where it is currently in orbit until its Hydrazine fuel runs out. During this phase of the mission, Dawn sent back incredible images of cryovolcanos and bright, reflective patches of salt which seemed almost like lights on the surface.
Dwarf Planet Ceres (Image Credit: NASA / JPL-Caltech)
I came back to the Dawn homepage while composing this update to see if there was any new information about the mission. I watched "Dusk for Dawn," a final mission review, and the opening comments from Marc Rayman, Dawn's Chief Engineer and Mission Director, really struck home...
Simulation of Dawn in flight (Image Credit: NASA / JPL-Caltech)
"When you work on a mission this long, it feels like a part of you." ~ Marc Rayman, Dawn Chief Engineer and Mission Director
I think that is a great way to describe what it's like to work on a complex project for a very long time. I think it also explains why we're all so incredibly excited to get the Fourth Edition out to all of you, and we hope that you will enjoy it as much as we have enjoyed creating it!
I've included the mission overview video here and I encourage you to stop by the Dawn project page. You'll definitely want to listen to principal researcher, Carol Raymond, describe the mission, what it seeks to discover, and what it has achieved so far. Very inspiring!
Thank You!
As always, thank you so very much for your support of the Mini Museum. If you have any questions about your pledge or shipment, please drop us an email at [email protected]. This includes any last minute address changes or anything else!
- Hans
Production Update! 130,000+ Specimens Complete! A View Shared Across Countless Generations - The Lunar Highlands Specimen
over 5 years ago
– Wed, Oct 17, 2018 at 01:48:49 PM
Hello, everyone!
I'm happy to report that we're still on schedule to begin shipping by the end of the month! We're still waiting on the first production Illuminated LED Stand, but everything else is on plan:
Mini Museums: Batch 01 and Batch 02 are in polishing and QA. First arrivals in the warehouse next week.
Add-ons: Assembled and heading to the warehouse tomorrow.
Companion Guide: Folded and gathered galleys of the Companion Guide received and approved. The binding process is underway and the guides should be on the way to the warehouse next week.
Mini Museum 4 Companion Guide Folded and Gathered Galleys "F&G's"
As noted above, the only outstanding item is the Illuminated LED Stand. I was hoping to share images of the production Stand in this update. However, after an on-site inspection of production-level components in China by Conner of Red Blue Collective, the team felt a few adjustments were needed before beginning the manufacturing run. We should have the new article in our hands early next week for inspection and approval. Please know that our focus is to make sure they are right the first time around, and I'll have more details to share next week.
130,000+ Specimens Complete
In addition to all of the items above, we've also finished and delivered all of the specimens for the final Kickstarter batches as well as the Small and Touch versions of the Mini Museum. That adds up to more than 130,000 individual specimens! This number represents thousands of hours of detailed work by the entire team. It's not easy by any means, but we all find it incredibly satisfying to see the results and get one step closer to sharing this edition with all of you!
In completing this important project milestone, I thought it would be fun to focus this update on one of the more complicated specimens in the Fourth Edition: the tiny "moons" we've made to showcase the NWA 5000 meteorite from the Lunar Highlands.
Lunar Highlands Specimens
A View Shared Across Countless Generations - Inside the Lunar Highlands Specimen
The night sky is filled with light. Speeding across unimaginable distance, the patterns traced by starlight reveal a panorama shared by countless generations of life, yet also unique to each mind's eye. This timeless view is a reminder of our place in the grand movement of the universe.
Looking at the moon on a clear night with the naked eye, we are struck by contrasting shades of light and dark. In the autumn of 1609, Galileo Galilei created a series of watercolors based on his observation of the moon through his telescope. Decades later, this landscape inspired astronomer Giovanni Battista Riccioli to give specific names to detailed features in Almagestum Novum (1651), and associate large regions with "Terra" and "Mare" (land and sea in Latin).
Francesco Grimaldi's map of the Moon from Almagestum Novum (1651)
The Terra are sometimes referred to today as the "highlands". These bright hills and domes are dominated by ranges of intrusive igneous rocks which formed as large plumes of magma cooled and crystallized within the crust billions of years ago. The dark Maria are basalts created during more recent volcanic floods on the surface.
Density of the moon's surface - lunar highlands represented in light green (Image Credit: NASA/JPL-Caltech/ IPGP)
The map above depicts the density of the moon’s surface. It was generated using gravimetric and topographical data from NASA’s GRAIL and LRO respectively. The lunar highlands crust averages 2,550 kilograms per meter cubed and is represented by the light green color.
The last major volcanic outflows on the Moon peaked about 3.2 billion years ago, but recent studies show that smaller outflows have taken place as recently as 100 million years ago.
Lunar skylight at Mare Ingenii, roughly 120 m (420 ft) in diameter (Image Credit: NASA/Goddard/Arizona State University)
As with volcanoes here on earth, the flood basalts also leave behind lava tubes, natural conduits through which the lava once flowed. Tubes near the surface sometimes collapse as a result of meteor impacts or seismic events. This creates windows or skylights revealing a hidden world within.
One marked exception to the creation of the "basaltic flood" maria is Mare Imbrium or "The Sea of Showers".
Mare Imbrium from a mosaic of scans taken by NASA's LRO (Image Credit: NASA/Arizona State University)
Mare Imbrium is actually an impact crater, one of the largest in the entire solar system. It is believed to have formed as the result of an impact with a protoplanet 3.9 billion years ago. An outer ring of mountains around the crater rises 7 km above the surface.
Creating the Specimen
The specimen in the Mini Museum is composed of fine-grained dust extracted from the NWA 5000 lunar meteorite.
A slice of meteorite NWA 5000 (Image Credit: Gregory M. Hupé)
One of the largest lunar meteorites, NWA 5000 is a gabbroic rock typical of highlands origin with evidence of impact melt. Argon isotopes indicate the mass crystallized after a large impact 3.2 billion years ago, then experienced a second impact just 500 million years ago which ejected it into space, sending it on a relatively quick trip to Earth.
When designing the look of this specimen, we wanted to evoke a feel of Francesco Grimaldi's 1651 map, so we undertook a painstaking process of trial and error to create a handcrafted "moon." After numerous attempts with a variety of materials, we developed a method that produces unique and beautiful specimens from this dense powder.
A selection of Lunar Highlands tests. All of these samples were tested in acrylic (along with many, many others)
To create these tiny moons, we begin by creating circular resin bases using silicone molds cast from a custom aluminum plate.
Creating a silicone mold from our custom milled aluminum die.
Drop by drop, the cells in the mold are filled to a precise height. Once cured, the bases are arranged for the next step.
Clear bases removed and arranged for the next step
With extreme care, each base is coated with a dusting of meteorite powder and then topped with a bead of fresh resin.
Adding dust from NWA 5000 to bases
Surface tension in the resin creates a natural dome, and the dust floats inside giving the entire specimen a three dimensional quality.
Curing Lunar Highlands Specimens
Does it always work out perfectly? No. As a matter of fact, there are so many factors at play here that an entire batch might be ruined even when taking extreme care.
Two batches of failed Lunar Highlands
In the picture above, two batches failed during the final curing step. Frustrating, to be sure, but it's also another reminder that every specimen has its challenges. Overcoming these challenges is all part of creating each unique specimen that goes into the Mini Museum!
Macro image of a completed Lunar Highlands Specimen
I'd like to thank Jen for all of her work on this specimen. Jen designed this specimen and came up with this unique method of assembly. Her hard work and dedication is very inspiring!
A Trip to the Moon
It seems appropriate to close out this deep dive into the Lunar Highlands specimen with a trip to the Moon. "Moonlight" is a moving visualization from NASA's Scientific Visualization Studio. As noted on NASA's website, the visualization "uses Lunar Reconnaissance Orbiter data to show the stark beauty of evolving light and shadow near sunrise and sunset on the rugged lunar surface."
This visualization attempts to capture the mood of Claude Debussy's best-known composition, Clair de Lune (moonlight in French). The piece was published in 1905 as the third of four movements in the composer's Suite Bergamasque, and unlike the other parts of this work, Clair is quiet, contemplative, and slightly melancholy, evoking the feeling of a solitary walk through a moonlit garden.
The visuals were composed like a nature documentary, with clean cuts and a mostly stationary virtual camera. The viewer follows the Sun throughout a lunar day, seeing sunrises and then sunsets over prominent features on the Moon. The sprawling ray system surrounding Copernicus crater, for example, is revealed beneath receding shadows at sunrise and later slips back into darkness as night encroaches.
The visualization was created to accompany a performance of Clair de Lune by the National Symphony Orchestra Pops, led by conductor Emil de Cou, at the Kennedy Center for the Performing Arts in Washington, DC, on June 1 and 2, 2018, as part of a celebration of NASA's 60th anniversary.
The visualization uses a digital 3D model of the Moon built from Lunar Reconnaissance Orbiter global elevation maps and image mosaics. The lighting is derived from actual Sun angles during lunar days in 2018.
Thank you!
As always, thank you so much for your support of the Mini Museum. We've locked down completed surveys at this point, so if you need to make a change just let us know by sending an email to [email protected]. Also, if you haven't finished your survey yet, drop by https://mm4.backerkit.com.
I'll be back next week with another update!
- Hans
Survey and Production Update!
over 5 years ago
– Sat, Oct 06, 2018 at 11:58:39 AM
Hello, everyone!
I hope this message finds you well! I am working on a longer update with a specimen deep dive, but I thought I'd take a moment here to update everyone on production and the survey process!
Survey Update
Thank you for the wonderful response to the BackerKit surveys! I believe we've just passed the 85% complete mark, so just a few hundred left to go!
We're planning to lock down surveys on October 12th, so if you haven't filled your survey out yet, please check your email for the special link or stop by https://mm4.backerkit.com to retrieve your survey directly. If you have any issues, send us an email at [email protected] and we'll help you get started.
Once surveys are locked down, you won't be able to make changes directly, but we can make changes if needed.
Please Note: If you've added any items to your pledge, we'll charge your card when it is time to ship, not when we lock down. The lock down enables us to get a "final" count on add-ons so that we can make sure the warehouse has everything they need to begin shipping.
Production Update
On the production front, everything is moving forward according to plan:
The first batch of Large Mini Museums has reached the polishing stage and the next three batches are in assembly. We're also preparing the specimens for the final batch of the Large as well as the Small.
Specimen add-ons and the Touch version of the Mini Museum are in assembly, and the first production sample of the Illuminated LED Stand is due in our hands late next week.
The Companion Guide pages are all printed. We'll have samples early next week for approval and then it's off to binding.
Assuming everything continues to move in the right direction, the first Mini Museum shipments should begin on schedule before the end of the month. If anything changes, I'll post an update as soon as we have all the details!
Please Note: For Amazon Water Vial backers *without* a Mini Museum add-on, your shipments should begin in about two weeks. We're adding an extra protective seal to the vials since they will not be encased in acrylic.
Thank You!
As always, thank you for your support of the Mini Museum!
I'll be back with another update once we have the production sample of the new Stand, along with a specimen deep dive!
- Hans
Surveys Launched, Discount on Multiple Illuminated LED Stand Purchases, BackerKit Step-By-Step!
over 5 years ago
– Fri, Sep 21, 2018 at 12:56:06 AM
Hello, everyone!
I'm excited to announce that the BackerKit surveys have gone out the door! You should receive your survey link by email in the next few minutes, so keep an eye on your Inbox and your Junk mail folder (just in case).
Step-by-step instructions for filling out the survey appear below, but I'd like to start off with a few notes including details about a new discount on multiple Illuminated LED Stand purchases!
Multiple Illuminated LED Stand Discount
After launching the stand yesterday, the first question we received was about a discount for multiple purchases. This is a great idea and I'm excited to announce we've worked a discount into BackerKit.
Multi-Packs Stand Discounts:
2-Pack (two stands): $5 discount PER stand for a total discount of $10
3-Pack (three stands): $10 discount PER stand for a total discount of $30
4-Pack (four stands): $15 discount PER stand for a total discount of $60
When adding this item to your cart, select the "multi-pack" discount from the drop down menu as pictured below:
Illuminated LED Stand Multi-Item Drop Down
If you only want one (1) stand, select Single. If you'd like 2, 3, or 4 stands, select the appropriate option and the price will change to reflect the total for all stands minus the discount.
Updated Price after selecting the 2-Pack option
Please Note: If you'd like to purchase more than four (4) stands, add the 4-pack option to your cart and then send us an email. We'll be able to add additional stands to your order and apply a $15 per stand discount to those items.
BackerKit Step-By-Step
These instructions are very long! Sorry about that but I wanted to be thorough for people who have never backed a Kickstarter before!
Once you receive your survey, click the green "Click Here to Respond" button. This will take you to BackerKit, which functions just like a standard online shopping site.
Sample of the BackerKit Email
Please Note: All of the screenshots in this update were taken from a desktop PC. On mobile devices, it will look a little different but the functions are the same.
After clicking the Respond button, you'll arrive at the welcome page. Select your country and then hit "Get Started."
Starting the Survey: Select your country first and then proceed forward!
Pure Love Backers: Since you were not asked for a shipping country during the Kickstarter campaign, you will not be asked for your country at this step. This means shipping fees might change once you've indicated your country during the address phase of checkout.
If you have any questions during the process, please do not hesitate to contact us by email or by using the "Need Help?" link that appears in the upper right corner of every page of the BackerKit process.
Time to Select Add-ons!
In the example above, the you can see the items in the reward tier listed on the right side of the screen. Add-ons appear on the left. If you do not wish to add any additional items, click NEXT to move on to your shipping address.
Pure Love Backers: Any funds you pledged to the campaign will show up as a credit when you enter the BackerKit survey.
Pure Love Tier Backer with Credit
The full list of add-ons is pretty long so I won't add screenshots of all of those here, just a sample to show you what you can expect as you scroll down the page:
Scrolling down the list of add-ons...
If you'd like to see the details of an item, just click the picture and a pop up will appear with information:
Product Details Pop-Up (MM4 Backer Shirt)
Space Shuttle Tile Backers: The Shuttle Tile Add-On will not appear on your list. Not to worry. You'll note that it is already in your cart.
Screenshot of a Shuttle Tile Backer's Cart
As you add items to your cart, your order total will change:
The cart now has add-ons!
Please Note: As you can see in this image, the discounted SMALL and TOUCH versions of the Mini Museum will appear at the top of the add-on list in MM4 Backer Specials (along with the shirt). The special pricing on the SMALL and TOUCH are limited to just one per backer. If you'd like to add more, the full priced SMALL and TOUCH appear in the Mini Museum category.
After adding all of your add-on items, click the NEXT button to move on to shipping information:
The Shipping Information Page
Please Note: We only use your phone number for shipping purposes so it is very important to have this information in case there is a delivery problem. If you live outside the United States, please be sure to include your country code.
After entering your address, hit NEXT and BackerKit will check your address against a standard postal database. If there are any issues, it may ask you to verify a possible change:
Address Standardization Pop-Up
The last step in the process is the payment screen. Here you'll enter your payment information:
The Payment Screen
If you scroll down, you'll see your add-on items and your pledge-level items:
Add-Ons and Pledge Items
The last step is to hit the green PLACE MY ORDER button.
All Done!
That's it! You're all set! Keep an eye out for your confirmation email!
Need to Make Changes? No Problem!
You have until October 12th to make any changes to your pledge. This includes changing your shipping address and making adjustments to add-on items. After the 12th, all pledges will be locked down and you'll need to contact us by email.
To make changes, the link in your original survey email or your confirmation email will take you back to the details at any time. If you accidentally delete the email, you can visit https://mm4.backerkit.com to retrieve the survey again.
Haven't received the survey yet?
You can also retrieve your survey directly at https://mm4.backerkit.com. Just enter the same email address you used with Kickstarter to retrieve the survey.
Survey Retrieval
If neither of these options seems to work, we probably have an incorrect email address for you on file. Not to worry! Drop an email at [email protected] and we'll have a look!
Thank You!
As always, thank you so very much for your support of the Mini Museum! We are all very excited to get to this stage of the project, and we're looking forward to shipping soon!
- Hans
BackerKit Launching Tomorrow at 4PM ET (GMT-4), Three Bonus Add-Ons Revealed!
over 5 years ago
– Wed, Sep 19, 2018 at 11:47:02 PM
Hello, everyone!
Before we get started, I want to make a correction to last week's update. I noted the incorrect timezone conversion for ET. It's actually GMT-4! Thank you to backer Aaron Harvey for pointing this out in the comments!
** BackerKit Launching Thursday, September 20th at 4PM ET (GMT-4) **
Bonus Add-Ons
Ok, at the very end of last week's long update, I mentioned that we had a few additional items to announce before the launch of the BackerKit. In fact, there are three!
Fourth Edition Backer Shirt ($25 USD)
Backer Justin Owen in the MM4 Shirt (with a little help from Photoshop).
No, Justin doesn't have the shirt just yet. I hope you don't mind, Justin. We all thought it would be fun to use your MM3 Shirt Photo to introduce this new add-on! ❤️
The design for the Fourth Edition t-shirt features the 4-way Mini Museum color logo we used in the teaser prior to the launch of the MM4. The textures in the logos actually come from some of the specimens in the Fourth Edition and compliment the accent colors used for the Large and Small Display Box.
Draft Art for the MM4 Backer Shirt
As with past editions, the shirt will be available in three shirt styles: Unisex, Fitted Women's, and Fitted Men's. Sizes range from to S to XXXL (all US sizing). The price for all sizes and styles will be $25. Our plan is to ship the shirts with your regular Mini Museum pledge, and all profits will be used to help fund the Educational Donation Program.
Unisex, Women's Fitted, and Men's Fitted
Please Note: The final design will vary slightly from the version presented here. We're still tweaking the spacing and size of the art, as well as working with a couple different printers to get the texture right.
"The Space Shuttle Orbiter wheel and tire design combined conventional aircraft materials into one of the most highly optimized assemblies yet developed. This is not obvious until the performance limits are compared to similarly sized equipment on commercial aircraft, which will reveal that the Orbiter's wheel/tire load capability is nearly twice as high." ~ NASA Engineer Carlisle C. Campbell, Jr., "Orbiter Wheel and Tire Certification" NASA Johnson Space Center, 1985
As many of you know, we are celebrating NASA's 60th anniversary with a launch of several specimens. The return of Apollo 11 was the first, the Space Shuttle Tile in the Fourth Edition was the second, and the third is the Space Shuttle Tire which we are offering first to Fourth Edition backers!
Space Shuttle Columbia Tire ($29 USD)
This specimen comes from a mission-flown, Space Shuttle nose landing gear tire which was removed from service after Columbia's 13th mission, STS-52. The specimen is encased in an acrylic specimen jar and housed in a 4x3x1 glass-topped riker box. A small information card is also included.
Macro image of a larger section of Space Shuttle Tire
As you can see above, the material is layered (in this case 20-ply) and highly irregular. Our target size is approximately 1x1 cm, but there will be some variation in width and length, making each specimen unique!
Final Shuttle Tire Specimens
About Shuttle Tires
Space Shuttle missions were always at a high risk for failure during the 30 minute re-entry into the Earth's atmosphere and upon landing safely at Kennedy Space Center or Edwards Air Force Base.
Closeup of the contact surface.
As the shuttle would glide at velocities just below the speed of sound, the four rear main landing gear tires and two front nose tires would need to accommodate not only the weight of the orbiter (upwards of 240,000 pounds ) - but also the extreme, rapid tire heating due to surface friction as the craft made ground contact at speeds of up to 250 mph. As a result, a blown tire was always considered a probable failure upon landing, and balancing this failure with the weight requirements was a challenging task.
Full Space Shuttle Tire
Yet, if you've seen a Space Shuttle in person, you've probably noticed that the tires are not much larger than a truck tire. However, they are quite different in their construction, and their performance is a testament to engineering and rigorous testing.
The chart above illustrates the typical load profile a tire is subject to during landing. It comes from the same "Orbiter Wheel and Tire Certification" study quoted at the start of this section. The intensity of the dynamic load profile tests each tire is subject to is just incredible:
"Dynamic load profile tests include 6 landings and 6 taxi tests per tire of which: 1 landing is a tire chilled to -35 ° F, 1 landing is a tire preheated to +135 ° F, 5 landings represent a 207,000 pound landing weight, 1 landing represents a 240,000 pound landing weight and crosswinds, and range of 0 to 20 knots."
Maximum Six Landings
The disposition paperwork which accompanied this tire did not indicate the tire's full mission history aside from the removal of the tire from the Space Shuttle Columbia (OV-102) after STS-52. However, it is possible that it was used with other orbiters. Nose landing gear tires like this one were rated for up to six landings, and though usually used just twice, tire rotation was a common practice.
About STS-52
Space Shuttle Columbia launching from Pad 39B. (Image Credit: NASA Astronaut Steven R. Nagel from a Shuttle Training Aircraft)
STS-52 launched on October 22, 1992. The main objective was to deploy the Laser Geodynamic Satellite II (LAGEOS-II) in cooperation with the Italian Space Agency (ASI). The ashes of Star Trek creator Gene Roddenberry were also carried aboard the orbiter for the duration of the mission.
STS-52 deployment of LAGEOS/IRIS spacecraft from OV-102's payload bay. (Image Credit: NASA STS052-80-030)
The flight commander was James D. Wetherbee, with Micheal A. Baker as pilot. Other payloads onboard included a Canadian Space Vision System experiment and a Tank Pressure Control experiment.
The shuttle traveled 4.1 million miles and completed 159 revolutions around Earth. On November 1, the spacecraft completed a successful landing at Kennedy Space Center in Florida. [NASA Press Kit for STS-52]
As noted above, this item is being offered first to backers of the Fourth Edition. It will appear in the shop to the general public later this year, and a detailed page about the specimen (including the information presented here) will be available on minimuseum.com!
YES, we finally have an official stand for the Mini Museum!
The Mini Museum Illuminated LED Stand was designed from the ground up to highlight the beauty of each Edition, from the First to the Fourth and beyond! We've been working hard on this one for months, and I'm so happy to finally reveal the prototype to all of you first!
Mini Museum Illuminated LED Stand
For the initial launch, only the Large size will be available but we are planning to create a stand for the Small as well!
Closer View of the Stand
The Stand is assembled from three (3) simple pieces: the Base, the Cradle, and the Top Cornice.
Illuminated LED Stand Components (Base, Cradle, Top)
Please Note: The prototype you see in all the pictures and the video here is a high-fidelity 3D printed sample. The production stand will be injection molded using a PC-ABS blend of durable thermoplastics.
The base features seven (7) LEDs. The LEDs are tuned to a color profile of 4300K (equivalent to natural daylight). The white color provides additional diffusion of light making the specimens really pop, especially those with reflective/metallic elements like the Amazon Water Vial.
Day and Night: Transition of the Stand through various levels of ambient light.
Three colored gel inserts will also be included to allow you to easily adjust the color. The lights are powered by three (3) AA batteries OR the USB port on the back:
Detail views of the Stand. Left: Micro USB power and 3-Way Light Switch. Right: Detail view of the Top Cornice.
There is a small 3-way switch on the rear of the base, as well as a Micro USB port. The switch is used to select the mode of operation (USB, Battery, or OFF). This allows you to plug the stand into a computer, wall outlet, or run cordless anywhere.
Please Note: The Micro USB port does NOT charge the batteries. The Illuminated LED Stand uses three (3) standard AA batteries which are housed in the base and accessed through a panel on the bottom.
Creating the Stand
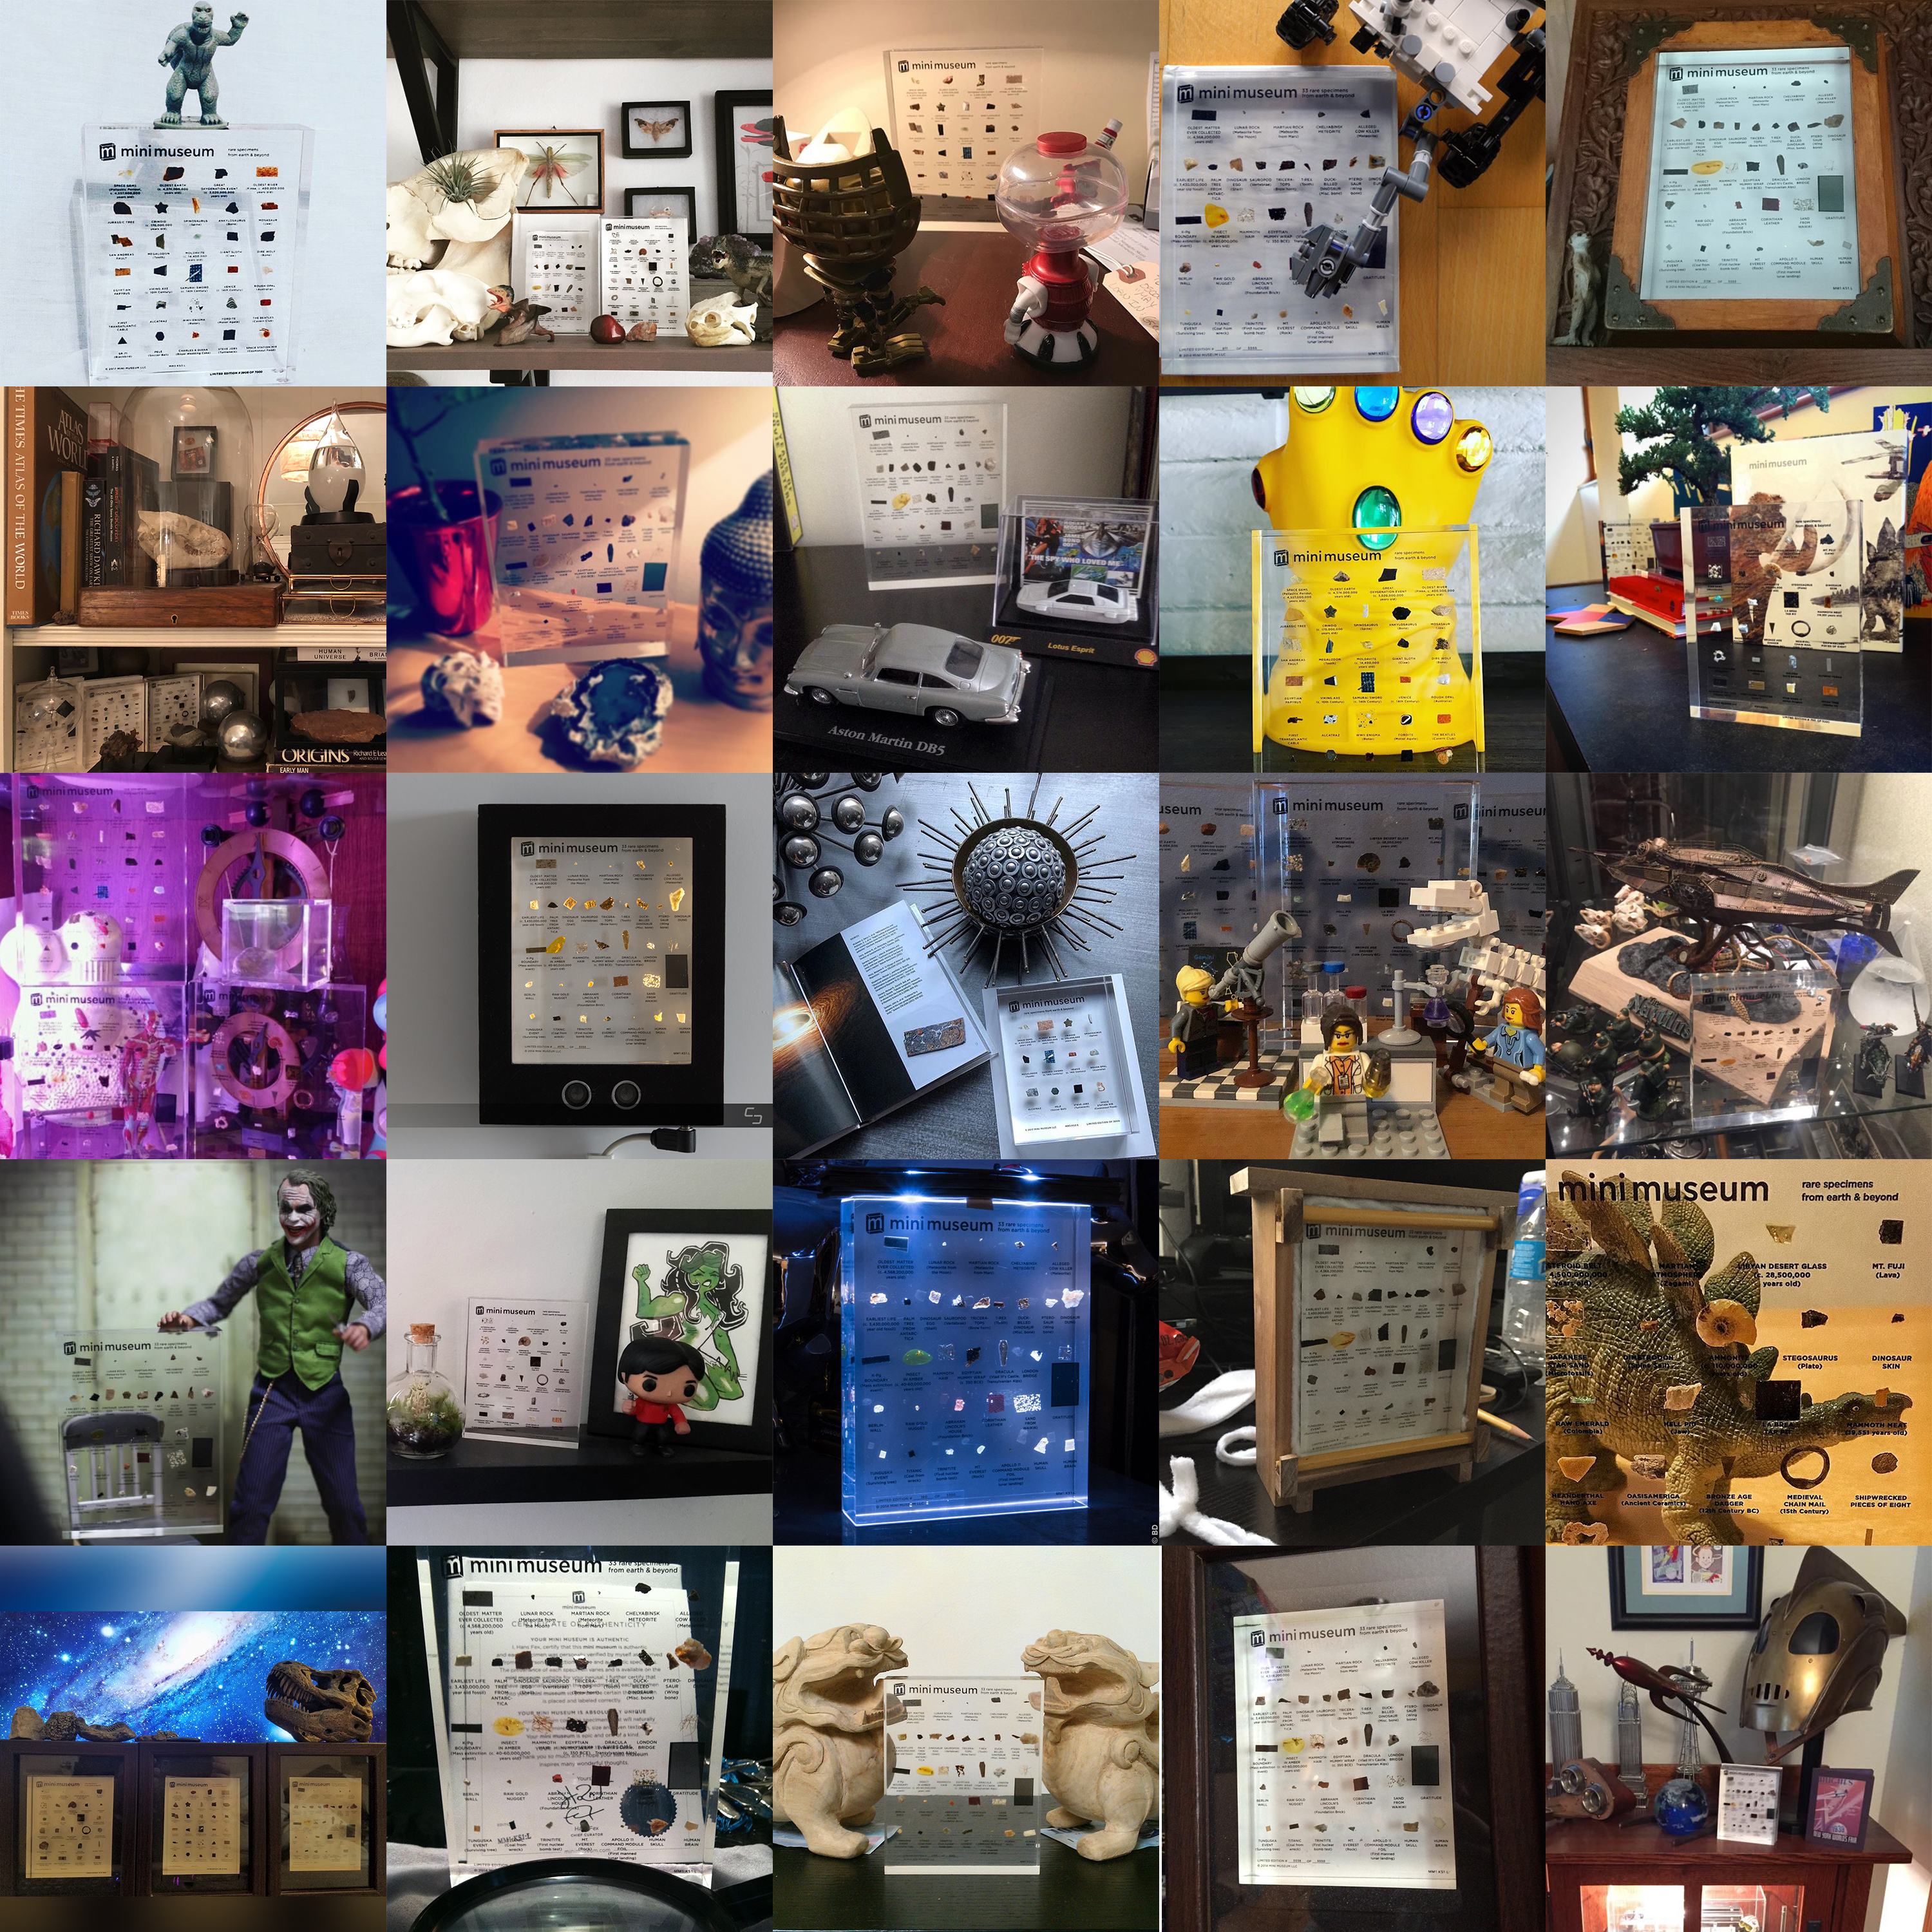
So many of you have developed your own amazing displays for the Mini Museum. In putting together this update, I went through all of the photos in the Backer album. If I could post them all here, I would, because they are all just beautiful!
To create the stand, we worked with Red Blue Collective, a team of local Northern Virginia makers and Kickstarter veterans.
Red Blue Collective Team discussing the finer points of what to talk about when making a video in front of a row of 3D printers. :D
Callye, Mike, and Connor were just as excited as we were, because they also happen to be Mini Museum backers (MM3/MM4)!
Mike showing off the Illuminated LED Stand at the Nova Labs Makerspace in Northern Virginia.
The team came up with so many great ideas, from the inclusion of USB power and multi-color gel inserts, to the addition of a custom set of clear, acrylic spacers to account for the small variations in the dimensions of each hand-finished Mini Museum.
I really couldn't be happier with the end result, and I can't wait to share the production model with all of you in just a few weeks!
Thank you!
As always, thank you all so very much! I hope that you're excited about these additions! I'll be back again tomorrow at 4PM ET (GMT-4) with another update as the BackerKit surveys launch!
- Hans
P.S. If you've read all the way down here to the end of this long update, I want to thank you! I also want to ask a favor.
Willie believes that no one reads down this far, so if you have read down this far please go back up to the top and hit the like button on the update. I'd love to show him just how many of you actually read all the way to the end! 😊
Thank you for your help! As a bonus, here's a picture of a friend I stopped to help on my way into MMHQ this morning.
P.P.S Is it cheating to use a turtle to prove a point? Asking for a friend. 🐢